

How to Build a Magnetic Tile Ambulance and Clinic with the 106-Piece Set
Some pretend-play calls are refreshingly mild: a stuffed bear needs a quiet ride, a paper note must reach the check-in desk, or a toy visitor has arrived five minutes before the clinic closes for dinner. This build gives that story two clear places to happen without taking over the whole room.
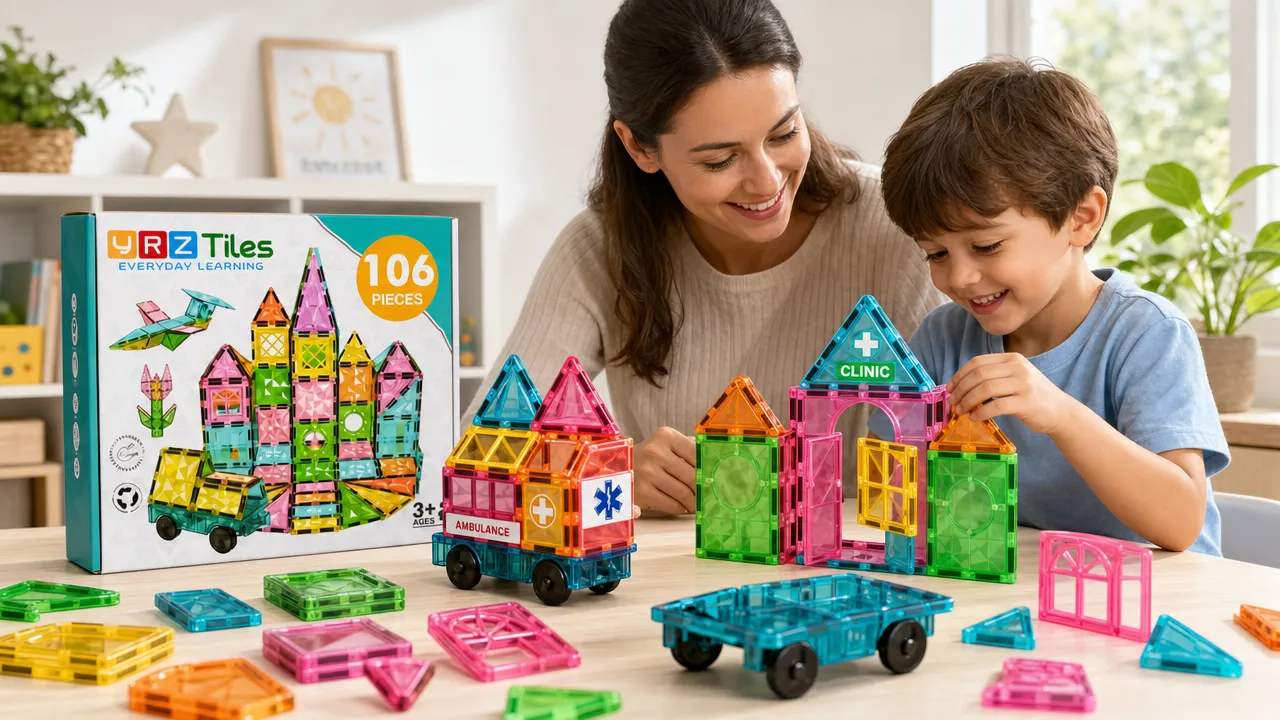
Use the single wheeled chassis from the YRZtiles 106pcs STEM Magnetic Tiles and Building Blocks to make one low ambulance-inspired vehicle. Then use separate pieces for a stationary clinic entrance and parking spot. The clinic stays in place while the vehicle travels a short route, so the activity works on a coffee table, a section of floor, or the cleared end of a dining table.
The set has exactly one wheeled chassis. That is all this scene needs: one moving vehicle, one destination, and one friendly check-in story. Nothing here is meant to copy a real medical emergency or teach treatment. Keep the situation fictional, calm, and centered on greeting, parking, and helping a pretend visitor feel welcome.
Set up a small build zone
Clear a flat build area. Use a tray, placemat, or open floor section if the table is needed for homework or dinner later. Leave room for a short route between the vehicle and clinic.
Set aside the following pieces before building:
| Build area | Useful pieces | Purpose |
|---|---|---|
| Vehicle | One wheeled chassis, several standard squares, a few triangles | Makes a low body and visible front |
| Clinic | An open square or door-frame piece, double-door panel, or squares | Creates an entrance or flat docking zone |
| Detail pieces | One window piece, rectangle, or small connector | Adds one clear clinic detail |
| Optional props | Scrap paper and pencil | Makes a clinic sign or route card. Not included with the set. |
Do not pull every tile into the build area. A smaller selection keeps the activity manageable and leaves spare pieces for revisions.
For a short after-school activity, use only the chassis, several squares, a few triangles, and one doorway or window piece. For a longer weekend build, add a flat tile route and two pretend stops.
Keep the single chassis visible while sorting. The vehicle can change shape during play, but there is only one rolling base to build on.
Build a low ambulance-inspired vehicle
Build the vehicle first. The clinic needs fewer pieces and is easier to adjust after the vehicle shape is clear.
1. Choose the vehicle direction
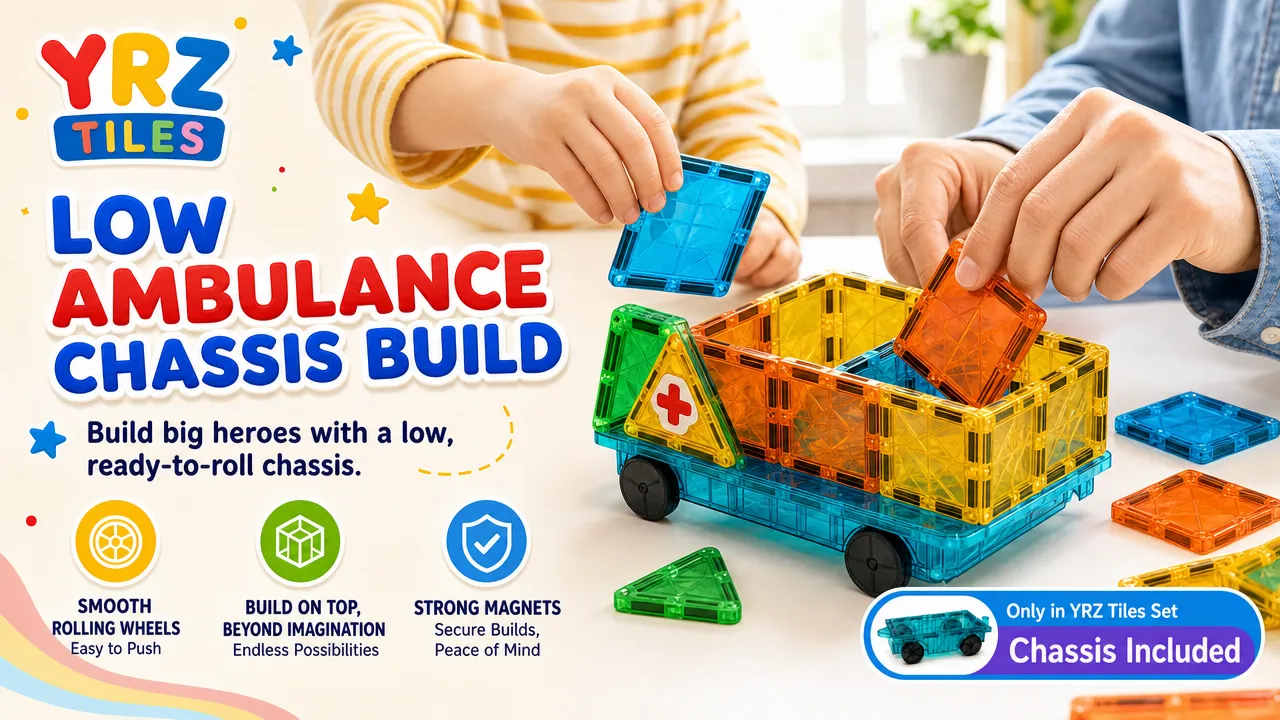
Place the wheeled chassis on the flat surface. Pick one end as the front. This choice helps children keep the build consistent when they add a cab, roof, or side panels.
Add one square or triangle near the front as a visual marker. The marker does not need to look like a real windshield. It only needs to show which way the vehicle will travel.
2. Make a low body
Attach several flat tiles around or above the chassis in a balanced arrangement. Use squares for the main body. Add rectangles only if they make the vehicle longer without making it top-heavy.
Keep the first version open and low. Do not start with tall walls or a wide roof.
A simple shape is enough:
- Create a flat body above the chassis.
- Add one low panel at each side if the pieces connect comfortably.
- Leave the back open or add a single square.
- Check that the body remains together when the chassis is moved gently by hand.
The goal is an ambulance-inspired vehicle for fictional play. It does not need medical equipment, patient space, labels, or realistic details.
3. Add side panels one at a time
Add one side panel. Pause. Add the second side panel. Pause again.
If the body begins to pull apart, remove the newest piece and return to a lower shape. A low open vehicle is easier to use than a taller model that needs rebuilding after every turn.
Use a triangle at the front or top only as a visual cue. Do not treat triangles as required ambulance features. Children can decide that a blue roof, a yellow side, or a crooked triangle is the vehicle's identifying detail.
4. Test before adding a roof
Push the vehicle gently across the build surface. Use a short movement only. Check for three conditions:
- The body stays connected.
- The chassis remains clear enough to move.
- The side panels do not lean outward.
Add a small roof detail only if the body remains stable during this test. Use a single square, a short bridge of pieces, or a triangle marker. If the roof shifts, remove it. The open-top version is the finished version for that play session.
5. Use a simple redesign rule
Change one part per test. Do not rebuild the entire vehicle after a small wobble.
| Problem | Likely cause | Action |
|---|---|---|
| Roof shifts | The top span is too wide or high | Remove the roof or use one smaller top piece |
| Side panels separate | Too many upright tiles were added | Reduce the walls to one low panel per side |
| Vehicle feels crowded | Too many tiles surround the chassis | Remove decorative pieces and retain the flat body |
| Front looks unclear | The direction marker is too small | Add one triangle or square at the chosen front |
This approach keeps redesign practical. The change is a repair to the pretend vehicle, not a failed build.
Make a clinic entrance and parking spot
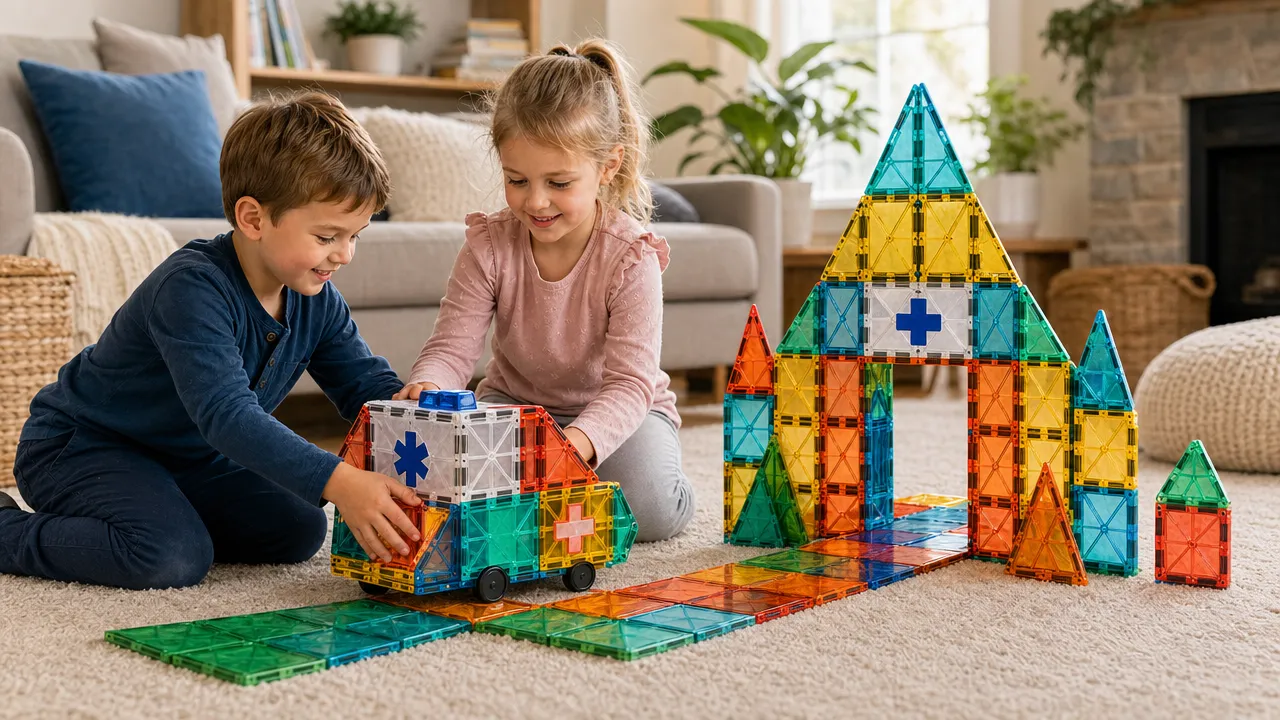
Build the clinic beside the route. Do not build it on the chassis. The clinic is the stationary destination for the ambulance-inspired vehicle.
Use an open square or door-frame piece if one is available. A double-door panel can also serve as the entrance. If neither piece is in reach, use two upright squares with one tile across the top. If the upright structure is unstable, build a flat parking square instead.
Build a compact clinic entrance
- Place one flat tile where the ambulance will park.
- Set the entrance behind or beside that tile.
- Add one doorway, open frame, or two low supports.
- Add one window piece or one rectangle as the clinic's visual detail.
- Stop after one detail. Do not use the remaining tiles to create several rooms.
A flat docking space counts as a clinic destination. The vehicle does not need to fit through an entrance. Parking beside the doorway is enough.
Use a scrap-paper sign only if it helps the game. Write "Clinic," "Check-in," or "Hello Desk." The sign, pencil, paper, toy figures, trays, books, pretend parcels, and play food are optional household props and are not included with the set.
Keep pretend play gentle. The vehicle can bring a friendly visitor, a library book, or a note to the clinic. Do not use injury scenes, treatment play, or emergency-response instructions.
Add a calm check-in routine
Once the entrance is ready, give the clinic a simple routine that children can repeat without turning the game into a medical lesson. The routine is about welcoming and organizing, not diagnosing or treating anyone.
- Park beside the flat docking tile.
- Say hello to the pretend visitor.
- Ask for a name or make up a cheerful one together.
- Place an optional paper check-in card at the desk.
- Choose a comfortable waiting place, such as a square tile beside the entrance.
- End with a friendly goodbye and return the vehicle to home base.
The check-in card is an optional scrap of household paper and is not included with the set. A child who does not want to use figures can deliver a note instead. One child might run the desk while another moves the vehicle; after one visit, switch jobs. If only one child is playing, an adult can ask a single prompt such as, "Who is visiting today?" and let the child direct the rest.
This routine also gives a busy family a natural stopping point. One complete visit can be the whole game on a short afternoon. On a slower weekend, add a second visitor or let the clinic move to a new spot on the rug.
Test the build with a short route
Set a route that begins at one tile, crosses a clear section of table or floor, and ends at the clinic parking spot. Two or three flat tiles can mark the way, but an imaginary road works just as well when pieces are running low.
Run the docking test in order:
- Start the vehicle at home base.
- Push it gently to one pretend stop.
- Return it to the clinic.
- Park beside the docking tile.
- Check whether the vehicle body and clinic entrance remain connected.
If the vehicle catches on a tile edge, move the flat route pieces farther apart or remove them. If the entrance falls, lower its top piece or replace the structure with a flat parking marker.
For siblings, divide the jobs without adding another vehicle:
- One child builds the vehicle body.
- One child sets the clinic entrance.
- One child calls the next route stop.
- One child completes the gentle parking test.
Switch jobs after one route. This prevents the single chassis from becoming the only job that matters.
Adjust the scene to fit the day
The same clinic setup can work for different ages, attention spans, and available space. Keep the physical build simple, then change the story rather than adding a tower of extra pieces.
For a ten-minute play window, make a low vehicle and use one flat tile as the clinic parking spot. Complete one check-in, wave goodbye, and drive home. There is no need to build an entrance if the family needs the table back soon.
For a longer session, add two destinations: home base and the clinic. A paper card marked "Check In" can sit at the entrance, while another marked "Home" shows where the vehicle returns. Both cards are optional household materials and are not included with the set.
For siblings, let one child choose the vehicle's front marker while another chooses the clinic entrance. During the first round, one moves the chassis and the other greets the visitor. Swap after the vehicle returns home. If both want to redesign the same section, try a one-piece handoff: each person changes one tile, then passes the build back.
When a child changes the plot halfway through, follow the useful part of the new idea. A clinic that suddenly becomes a welcome center can still use the same entrance, parking spot, and check-in desk. The vehicle can deliver a lost book or bring a new staff member. The story changes; the build does not need to start over.
If the family wants to remember a favorite version, take a quick photo before dismantling it. That can make cleanup easier for a child who is not quite ready to say goodbye to the world's most colorful reception desk.
Reset the scene safely
Reset the set in a fixed order. This makes the next session faster and helps the one chassis stay easy to find.
- Remove every tile from the wheeled chassis.
- Put the chassis in one designated spot in the storage bin.
- Stack larger flat tiles together.
- Group doorway and window pieces together.
- Recycle optional paper signs or store them with craft supplies.
- Check the floor and table before leaving the area.
This activity is for Ages 3+. An adult should inspect pieces before play. Stop using cracked, separated, or damaged pieces, or any piece with an exposed or missing magnet. Keep magnet-containing pieces away from younger children. Seek immediate medical attention if magnet ingestion is suspected. For more information, see the U.S. Consumer Product Safety Commission's magnet safety guidance.
A low vehicle, one clinic entrance, and a short route are enough for a complete play setup. Build one version, test it, simplify it if needed, and let the check-in story do the rest. When the visit is over, the same single chassis is ready for another idea on another day.